New Home Construction Tips
Plan you new home construction project before construction starts to include key upgrades!
 Let's face it your family's needs do change with time and the home you currently own may no longer meet those changing needs. Smart builders know this and strive to provide the latest floor plans and modern amenities designed to meet today's ever changing needs. Whether it is increased energy efficiency, more technology features or carefully designed floor plan ergonomics, you can find or build the house of your dreams. If you decide to build from scratch as opposed to the purchase of a completed builder SPEC you must keep in mind that certain desirable amenities must be planned for ahead of time and added at specific stages of construction.
The information found in this report will help bring to mind the type of upgrades you may want to incorporate in your new home when you plan to build from an empty lot. Now the real work begins as you have only a certain amount of time to make plan changes with the builder if you want to have the upgrade features listed below. Part of ARG's job as your agent is to help you understand your options during your home's construction and to provide an alternative prospective from what you are getting from the builder's sales associates and or construction manager.
After working with hundreds of new home buyers ARG has developed a list of sought after features you should consider if you are going to build a new home from the ground up. Adding them during construction is not only cost effective, but may be the ONLY opportunity you will ever have to add these features to your new home. Getting your home right NOW may mean having less and less reasons in 5 years to want to move again (and go through all the expenses associated with moving). The key is to get pricing from the builder during contract discussions and then to add those items to your contract BEFORE construction starts.
Time Sensitive Upgrades - Plan Ahead to Get Key Upgrades Included!
To properly and accurately plan your new home, ANY and ALL specifications should be in your purchase contract. This way you KNOW that you can in fact include these upgrades before you SIGN your agreement.
- Nail Down Hardwood Floors - The reason this makes the list is the fact that if your new home is a 2-story your entire staircase will be affected. If a rug or tile is in front of the bottom step than adding a nailed down wood floor after your home is built will mean your bottom step will be about 1.5" shorter then all the rest of your steps. Builders always determine step height by the floor material that is in front of the staircase. IF you plan on adding wood floors after you close then you will want the builder to make sure they add wood floors in the hallway where your staircase is located. This way you will avoid the "short step" problem later on when you complete your Hardwood Floors.
- Single Garage Door Width - Don't let your builder put in 8' doors!!!! You need 9' or you will have to fold your vehicle mirrors getting in and out! 8' doors might work if you own a VW Bug or a Fiat, but not with SUV's or Pickups, which just happen to be the vehicle of choice for many Texans. This needs to be known before the slab forms are put in place.
- Garage Door Height - Want to park a boat or F250 that is lifted? Make sure you design in an extra high garage door. Its easy enough to do if the builder knows about it before Framing begins or better yet BEFORE you sign your contract. This way the changes you want are tied to you doing business with that specific builder before you write an earnest money check.
- Garage Length and Width - Well if you are going through the trouble of adding a taller door then you want to make sure you are at least 22' long if you are to park your F-250 or similar sized vehicle. Garage dimension may be limited by lot size especially if you are building on a lot less than 60' wide or 120' deep.

- Sink in Utility Room - Make it as deep as possible. Plan before foundation is poured so plumbing and drains can be set.
- Adding a Bathroom - Sometimes some floor plans just don't work because they lack a needed bathroom and sadly many new home buyers who lack the proper number of bathrooms won't figure this out until they RESELL they new home. Anything associated with plumbing needs to be known upfront even before you home plans are submitted to the City for a building permit.
- Salad Sink in Kitchen Island - Having a 2nd sink in the Island helps during food prep and clean up. Don't forget a 2nd sink disposal.
- Refrigerator or Freezer Power Plug in Utility Room or Garage - This must be added during the Frame Stage. This is important because this line needs to be on its own protected circuit to prevent breaker trips on other outlets.
- Ice Maker Water Line to 2nd Refrigerator - This must be done before Foundation is poured.
- Closes Dryer Gas Line - Complete during Frame Stage.
- Gas and Electric Drops for Kitchen Cooktop - If located in Island, this must be known by your builder before the cement is poured.
- Wet Bar Prep - Rough in for wet bar power, Cabinet Lighting Switches, plumbing drain and water supply. This will allow you to install a new wet bar later on if you don't have the builder install one during construction.
- Recessed "Can" Lighting - Especially on 2-story homes, you really need to look at this closely as many homes have insufficient lighting. It is very expensive and difficult to install additional 1st floor can lighting into homes that have a 2nd story above without making a lot of holes in sheet rock. This needs to be added no later than Frame Stage.
- Art Deco Lighting - This is GREAT for wall recesses as you can add warm lighting for some of your favorite art work or family portraits. Remember all this is EASY and cheap during the build process. Afterwards this sort of retrofit becomes a mess and can mar sheet rock.
- Solar Light Tubes - If you love natural light then adding a single solar tube to a kitchen or family room or any other darker area of your home will really lighten and brighten up your living space. Solar lights once installed bring sunlight into your home saving you the need to turn on lights. Solar Tubes run about $700 per drop. If you are building a 2 Story home you MUST plan these at build stage as retrofitting will be impossible.
- Sconce Wall Lighting - In Media Room or elsewhere, must be completed during Frame Stage.
- Sconce Staircase Lighting - Add at Frame Stage.
- Flush Mounted Soffit Lights - These are so cool. Once you see them you will want them. They are located in an area that is protected from weather unlike lights that are mounted close to the foundation. These need to be installed at Frame Stage.
- High Intensity Florescent Lights - These florescent bulbs are narrower or have a smaller radius, but put out double the light or more. This type of lighting are a MUST for Utility Rooms, Garage Work Areas, Pantries and especially the MASTER CLOSET. No your eyes are not going bad! Most builders simply "poo-poo" lighting in these areas. It is CHEAPER to NOT have them put cheap lighting in, but credit you for the more expensive fixture, which really is only a few bucks more!!! THIS IS A MUST.
- Automatic Lighting via door open & close switches - these are PERFECT for closets and pantries. These need to be installed at FRAME STATE when the home is being wired. Open the door and there is LIGHT, close and there is NO light! Perfect!!!
- Exterior MOTION Lights - Got a place around the house where you want a MOTION light? Now is the time to put that in. The builder will credit you the fixture you don't install and price out the motion light fixture.
- Concrete Wall Board for Bathroom Wet Areas. Want to truly bullet proof your shower / tub areas? Use concrete board versus green board. Concrete board is impervious to water damage and really grips tiles in a more permanent fashion. This should be in your contract to build up front.

- Soffit Lights - Under Soffit low voltage or low wattage spots add excellent accent lighting and a unique looks. See Picture to right.
- Flat Panel Screens - Cable and power drops in Bedrooms, Master Baths, Garage or any other "Special" location that will allow you to mount a Flat Screen without having unsightly power and cables running up your walls. Add at Frame Stage. Also consider if you want an outdoor monitor as plugs and video cables can be installed cheaply when building versus retrofitting.
- Video - Power Drops for Media Room Front Projector complete during Frame Stage.
- Whole House Internet - Wiring and Plug-n-play tech center for all TV, Telephone, Internet and Network equipment, routers, amplifiers and modems. The fact is wireless is a DOWNGRADE compared to secure hardwire communications. Wireless can be much less secure if unencrypted since your network signal can be picked up all around your home. Add at Frame Stage.
- Extra Network - Additional drops for your home office – I recommend 2 Drops to be added at Frame Stage.
- Adding Fiber Optic Cable Network - Yes ARG has had clients who have installed fiber optic light pipes in their home. Fiber optic communications will be lightning fast and it is now only a few years away. Add at Frame Stage.
- Home Speaker or Intercom System - Whole house intercom or speaker wiring for background music. Add at Frame Stage.
- Extra Closet Storage Shelving - This way if the Builder puts a nail in a PIPE behind the wall, he will catch it during construction. Add before paint stage.
- Outdoor Speaker Drops - Add at Frame Stage.
- Outdoor Video and Power Drop for Outside TV - Add at Frame Stage.
- Security Cameras - Front and rear entry Video Cable Drops added at Frame Stage
- Christmas Light Outlets - Installed under roofline in the Soffits. These convenience plugs are added at Frame Stage. For added convenience add an indoor on/off switch and MAKE SURE this outlet is on its own individual circuit breaker in your main breaker panel.
- Outdoor Spotlights - Tree Lights or exterior house lighting. Frame Stage. Choose low voltage lights to help save on electric cost.
- Built-Ins - These may include Kitchen Cabinet Garbage pull outs, Wine Lattice wind rack, Pasta Bins, Butler Pantry Cabinets, kitchen "bread box," Book Cases, and entertainment built-ins. Must be known a few weeks before cabinets will be installed. Butler's Pantry would have to be designed in at early planning stage.
- Shower Head in Master that is HIGH ENOUGH!!! - You'll be glad you added this one at the Frame Stage during Plumbing installation.
- Extended Patio - This needs to be planned before the slab is poured especially if you want the Patio extension to be part of the foundation structure. You can always add afterwards, but be prepared to tear up sprinkler lines and sod. Seems to me it would be cheaper to include day one!
- Outdoor Gas Line to Grille - Add at Frame Stage.
- Outdoor Kitchen - Any outdoor plumbing and power drops for an outdoor kitchen should be added before Foundation is poured.
- Extended Driveway - Handy for added parking opportunities, this must be decided before foundation is poured. It is cheaper for builder to add this from the Cement Truck then to mix up individual bags afterwards PLUS all the Cement matches.
- Extra Power Drops in Garage - These may include a speaker drop, video drop or extra outlets in construction benches. The Garage is a UTILITY ROOM so give it MORE UTILITY! Like to spend time in the Garage? Maybe these features will help! Add at Frame Stage.
- Attic Storage - Locate a logical space in your attic for storage. At Frame Stage. To do one better identify an area under roof that can be included into the interior space. If you insulate this space it will help keep storage items within a more tolerable temperature range WITHOUT adding AC and Heating ducts. Better home builders include this in their plans. Texas is not the kind of place to store valuable items in an attic that is not temperature controlled.
Energy Efficiency Upgrades
Energy upgrades are critical for many reasons. Not only will it save you money on utility bills and help lower our national dependence on Mideast oil, it will also provide increased year round comfort. A drafty cold house in the Winter, followed by a difficult to cool home in the Summer combined with high utility bills will be a huge let down especially if you went through the trouble to build your home from the ground up.
Here are key suggestions that have proven to help:
- Solar Light Tubes - If you love natural light then adding a single solar tube to a kitchen or family room or any other darker area of your home will really lighten and brighten up your living space. Solar lights once installed bring sunlight into your home saving you the need to turn on lights. Solar Tubes run about $700 per drop. If you are building a 2 Story home you MUST plan these at build stage as retrofitting will be impossible.
- Whole house Radiant Barriers - These go under the brick veneer and 2nd floor cement siding. If this is not added during construction you will forgo ever having this cost effective energy efficient feature on your home. The Radiant Barrier works by reflecting over 99% of heat carrying infrared radiation away from your exterior walls. Your home's exterior walls are where a lot of cooling efficiency is lost. When barriers reflect heat producing radiation from your home's exterior walls your insulation becomes more effective and your AC System works less to maintain a comfortable environment. In fact most homes that have whole house radiant barriers need to have their AC Systems "tonnage" downsized to prevent short cycling. Smaller AC Systems cost less!
- Radiant Wall Barriers for Winter Efficiency Too! - In the Winter Radiant Barriers will also provide an effective radiant barrier against heat loss through infrared radiation transmission from your home's exterior walls. Most homes can be wrapped for $1000 to $2000 depending upon the size of your home. Many foil barriers carry a lifetime warranty and can be purchased with tiny perforations that allow the wall to breath so as to prevent possible moisture or mold problems.
- Adding Attic Radiant Barriers - These include Barriers other than foil that are glued to the inside your new home's roof decking. Proper placement of Radiant Barriers is critical for achieving maximum living space comfort and efficiency benefit.
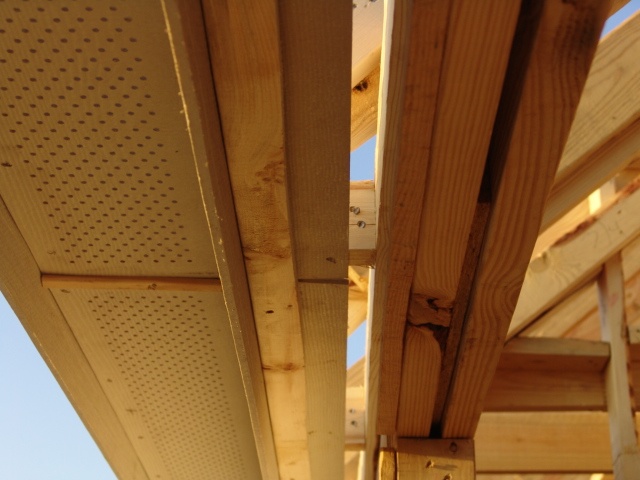
- Whole House Perforated Cement Soffits (pictured below for reference)- for increased attic ventilation. ARG can show you what to look for. If your Attic is uncomfortably hot, then your AC System is operating under overly harsh conditions, which means your AC System must run longer to overcome duct losses. Attic Ventilation, is the most critical parameter to control and is critical to maintain interior comfort and lower utility bills.
- Adding Additional Roof Vents Using Turbines and Ridge Venting - Attic airflow is critical to achieving a cooler attic. A cooler attic means your AC System works in a cooler environment and heat absorption into your home from a hot attic is lessened.
- WINDOWS - According to the Texas Window Initiative, windows account for 46% of the heat load or energy loss of a home! This is HUGE! TXU Electric is estimating that utility costs will rise 15% a year for the next 10 years. This means a $300 Electric Bill today will potentially cost over $1000 in 10 years. Clearly Windows are a huge factor in how your home will live and what you pay per month. On December 22, 2008 Mike Askins of ARG visited Darling Homes at Tucker Hill and took Infrared Temperature measurements off of their windows and compared this to a 2005 Highland Home with Low E windows. The temperature was 27 degrees outside. This was the 3rd day of consecutive cold weather with the low temp around 17 the night before. The Darling home's thermostat was set at 72F but was significantly warmer than the older Highland Home set at 74F with a Gas Log Fireplace insert going 100% of the time. The reason - aluminum framed windows versus vinyl framed windows. Darling Home's Jeld-Wen Vinyl windows indicated a 72F temperature reading on the inside glass, compared to 51F on the inside of the double pane aluminum framed windows. Quality windows will pay for themselves in energy savings and interior comfort.
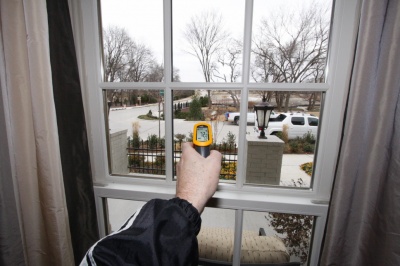
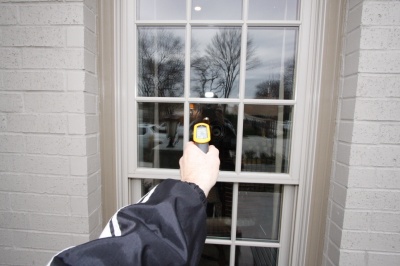

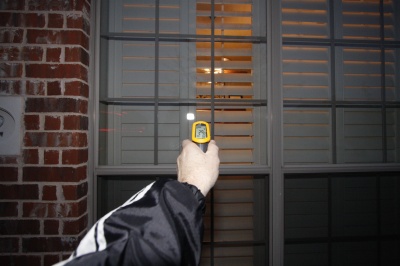
It is very self-evident that Aluminum Windows are Colder in the Winter and HOTTER in the Summer and this does nothing but hurt energy savings. Darling has the right window, not cheap vinyl windows but high quality high efficiency Jeld-Wen windows.

- Vinyl Windows - for South and South West facing window locations that are not shaded by trees or a porch. ARG can help you understand your choices in these critical locations. As more and more builders switch to High Performance Low E Vinyl Windows the cost to produce these energy efficient alternatives have become less. The benefit is absolutely easy to discern especially when you compare a West Facing Aluminum Window at 5Pm during a HOT Texas Summer's afternoon to a modern high performance Vinyl window. The difference is amazing.
- Thermal Break Aluminum Windows - Vinyl windows are high performance windows, however their lifetime will not match the durability of an Aluminum Frame. Hence the new addition to the window lineup - "Thermal Break." This windows is manufactured with an outside and inside Aluminum frame that is separated by a Fiberglass center. The Fiberglass prevents the heat or cold on the outer frame from jumping across the insulator. In the Summer, the inside frame will remain near room temperature, while the outside frame can be as hot as 130 degrees. Standard Aluminum frames would transmit the outside heat into the the room increasing the work load on your AC and Heating system.

Visit http://www.thermalwindowsdfw.com
- Blown Cellulose Insulation - in exterior walls, 2nd floor walls that face attic space and Ceilings. Cellulose provides up to ~ 1.5x more R value per inch and greatly reduces air gaps in the walls that are common with fiberglass and provides a much improved sound proofing quality. Combine this with Foil Barriers for a very noticeable difference in your new home. IF you install this into your home you will be need to downsize your AC tonnage as your home's efficiency will increase.

- Rock Wool Insulation - This is an inert type of insulation made from rock. Basically rocks are carefully shredded and the "wool" that results is used to insulate your house. Rock wool is very efficient and does not settle over time like cellulose can and bugs can't eat it and moisture can't hurt it.
- Foam Insulation - Partial or Full application will provide the most energy efficient home possible with the lowest possible air leakage. The expense for this type of insulation material is higher, but the pay back is much faster. PLUS the interior comfort levels are very uniform on both the first and second floors and the AC System in the attic operates in near ideal temperatures (mid 80's) for maximum efficiency. This type of system needs a special AC ventilator system to introduce fresh air into your home. IF you have ALLERGIES, this type of whole house foam insulation is perhaps the best way to control your interior air quality when combined with a whole house humidifier and Electronic HEPA air Cleaning system. CLICK HERE to obtain more information on whole house spray foam insulation.

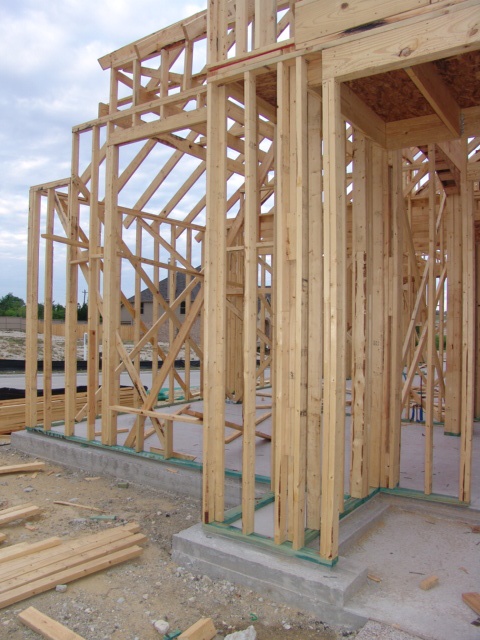
- Install an Energy Brace Backing Sheathing - on all 2nd floor walls PLUS Radiant Barrier Foil that face any unconditioned attic space. This actually allows insulation to perform better and hence better temp control for your 2nd story living space. Energy Brace is inexpensive and is easy to install.

Photo shows Energy Bracing Material over outside of wall insulation. This is an Energy Star requirement. Using Foam and or a radiant barrier would also improve your insulation factor while reducing your energy bills.
- AC Ducts - It is imperative that these are laid out properly if you are to achieve maximum SEER capability of your AC Units and to properly distribute air throughout your home. 14 SEER AC Systems matched to an inefficient Duct means poor distribution of air flow, uneven temperatures and increased energy usage. It is somewhat shocking to see how many builders do not require energy efficient duct placement, Radiant Barriers and upgraded insulation options as these upgrades are EXTREMELY COST EFFECTIVE and will pay back quickly. As an ARG Client we will help you understand what to look for and how to insure your home will perform to its maximum capability.
 16+ SEER AC Systems - AC systems go all the way up to 21 SEER. Yes they cost more, but during the last 12 months prices have really come down. When you are building you should consider upgrading your AC to a higher SEER. If you add the insulation upgrades suggested on this webpage you will need to downsize your Tonnage to prevent "short cycling" of the AC system. Short cycling means your home is so efficient that the units do not stay on long enough and this is bad because humidity is not being removed properly. To prevent short cycling the size or tonnage of your AC system needs to be reduced and this alone will reduce your AC system cost. Smaller tonnage draws less amps and this in turn saves you a lot of money.^ Back to Top
Radiant Barriers
- Retrofitting New Inventory Homes or Existing Homes can also be considered. I have found that Rima International provides good consumer information about how foil barriers work.

Radiant Barrier Retrofit. Double layer added over insulation
GENERAL DISCUSSION
In the picture above foil radiant barriers have been installed over the attic insulation to prevent infrared radiation (IR) that is being retransmitted from the underside of the roof from striking the insulation that sits directly over the living space below.
One of the requirements for a radiant barrier to work is that it must have an "AIR GAP" in front of the foil that is facing the source of incoming IR. That is why the barrier is on top of the insulation in the home pictured above and not glued or spray painted on the underside of the roof decking. Placing the foil over the insulation prevents IR that is being retransmitted from the underside of the boiling hot roof decking from striking your attic insulation, thus helping the insulation over your living space stay cooler. I have been in countless homes and can tell you that the undersides of Texas roofs with or without a radiant barrier painted or glued to it becomes boiling hot during the summer months.
WHAT IS INFRARED RADIATION (IR)?
Infrared radiation is a frequency that has no temperature in and of itself until it strikes a surface where it then transmits heat energy into that surface. That is why space vehicles are "foil wrapped on the outside." In Deep Space the temperature is approximately -270 Celsius (-454 Fahrenheit) YET there is an exceptional amount of IR present. This would suggest applying the foil over your shingles would actually give you the most beneficial radiant barrier effect and that is to reflect incoming IR before they strike a temperature absorbing surface like your dark gray tar based composition shingles on your roof.
That is why a big Texas tree is your best radiant barrier! Think about it! The tree prevents IR from the Sun from hitting your roof's shingles! If shingles stays cool your attic stays cool. Once a surface gets hot, it begins to re-transmit IR. In the case of a typical Texas house, that means IR is re-radiated from the underside of your roof decking plywood sheets into your attic insulation - NOT A GOOD THING! In my opinion gluing a radiant barrier to the underside of your home's roof decking does little as the physically attached foil quickly adjusts via "direct heat conductance through a solid" to the temperature of the HOT roof and acts like a huge hot radiator surface.
I know one of the technical properties of a true foil radiant barrier is extremely low emissivity which means the hot foil has a very low rate of IR retransmission. However the hot foil does quickly heat up the attic air until the attic resembles a Dutch oven. The point here is that homes with radiant barriers glued or painted to the underside of roof decking still have hot hot hot attics that help to compromise a homes energy efficiency.
LOW EMISSIVITY CAN STILL BE A HOT PROBLEM!
Even if a major characteristic of a radiant barrier foil is low emissivity, which means when the foil itself gets hot it has a very low rate of retransmitting infrared radiation towards your attic insulation, the foil can still become a very hot surface and when you multiple a hot radiant barrier by the large surface area that most roofs represent, you still have a very hot attic by the fact that the hot surface will impart its heat energy into the attic air itself. Just touching a radiant barrier in the hot afternoon will confirm the fact that foil barriers can and do get scorching hot.
As a Realtor, I have closely looked at a number of radiant barrier installations by a variety of home builders and I can tell you that some of the hottest attics had radiant barriers glued to the underside of the roof decking. This means if you are to rely on the low emissivity principles of a radiant barrier you must have adequate attic ventilation. At best the 'underside' radiant barrier becomes a time delay device for heat build up and for it to work correctly is fully dependant upon sufficient attic ventilation (air exchanges).
So if you are going to retrofit a home and can't improve the ventilation aspects of your attic so hot air can freely circulate to the peak of your attic and out ridge vents, turtle vents or power vents, then you should be considering installing the radiant barrier over your attic insulation.
This leads me to conclude that the primary intended purpose of the radiant barrier is not due to its low emissivity characteristics, but rather to primarily defeat incoming infrared radiation by reflecting it away from surfaces directly underneath the foil barrier, hence preventing that surface from getting hot in the first place means an external barrier application over and not under a surface.
If inside radiant barrier foil applications really work (low emissivity principle) or are the primary intended use of a radiant barrier foil then why are space vehicles not employing the same technology the housing industry seems to embrace? The last time I checked, space vehicles all have the foil radiant barrier on the outside.
There are lots of opinions out there, and you have read mine, but it seems more logical to shield your living space with a perforated radiant barrier foil directly on top of your attic insulation or over your roof's shingles if you are to realize optimal results from the use of radiant barrier technology. This way you preserve the required "air gap" needed for a radiant barrier to reject or reflect incoming IR Radiation before it strikes a heat dissipating object like your home, or you can find a BIG TREE and place close to your house on the South West Side, but it will cost you much more.
Good luck on getting city zoning approval for an external highly reflective radiant barrier over your roof shingles! Anyway I would love to hear opinions on this subject. You can post them on my BLOG.
Construction Issues to Consider
Over the years many of the traditional materials used by builders have changed to man made materials. Many times this was to add durability, prevent warping and in some cases to save money. The issue of plumbing goes down the same lines and is bringing changes to the way new homes are being built. How this may effect you will be discussed. ARG has no position on what product is best suited or how either product is installed. We would suggest contacting a licensed building engineer for suggestions or advice with regards to plumbing products.

50 year warranty on copper tubing
- Plumbing - Copper or Plastic? What is best? What lasts? What are the potential hazards or future problems? These are some of the common questions people ask when considering the type of pipe to use when installing new plumbing. Many new home builders have switched to a PEX plumbing system in their new homes in the DFW / North Texas area over the last 4 years. Although there are no long term studies to determine suitability and longevity, the building industry has taken the position that PEX is an improvement over Copper. Earlier generations of this product where prone to failure due to chemical interaction with Chlorine in water. Unlike copper plumbing, which is the traditional and mostly reliable standard for in home plumbing you find yourself either accepting the industry changes to PEX and or building a new home with Copper. Copper will cost you about ~$2K - $5K more per home depending upon size, baths, etc. Don't be afraid to ask questions. For information on PEX click here.

Picture shows Poly Lines that will run into new home through soil and concrete. Slab has yet to be poured.
- Structure - What sheathing to use on the exterior frame. What you must do to achieve a more solid wall construction.
- 2nd Floor Decking - Real Plywood versus OSB? Weight Bearing considerations for heavy 2nd floor furniture and longevity questions.
The professional team at Askins Realty Group, McKinney, TX, will be happy to answer any questions you may have regarding new construction or McKinney and surrounding area real estate. Please email or call (972)529-2394 Local Office.